Going Serverless
Sunday, 09 January 2022 @ 20:18
Over the years this blog has been many things:- a Wordpress site; a Drupal one; Zend Framework, Symfony, Slim & Silex from the PHP world; and even recently Java. I'd use it as a playground to experiment & learn about new technology and just dump it on AWS instances along with other projects I had on the go at the same time. It's probably fair to say I spend more time rewriting my blogging platform than I do writing actual blog posts!
So in its latest incarnation it was backed by a MySQL database, there was a "back-end" admin section where I could edit the articles (mostly in markdown via a single large textarea) and a bit of templating to render the "dynamic content".
Normally, this is fine and the hosting costs and management just blend in with larger projects I have on the go. However, over the last two years I've dialled a lot of other things back and ended up running an EC2 instance and RDS Serverless database JUST for this blog. That's pretty expensive - about £3 per day!
I starting thinking about converting the blog to static HTML. I knew tools existed that could be used to provide templating and convert markdown into HTML, I'd just never really investigated that space much. So that's exactly what I went off to do.
After a few days, I had come up with the following choice of technology and tools:-
- HUGO for the static site generating. It's very fast and is a single binary written in go which made it very easy to get "installed" and start experimenting.
- S3 for the storage. If you want to serve files on the internet, they have to live somewhere! :-)
- Cloudfront provides two important things. First, it lets me point my own domain name to the S3 bucket whilst using https and provides Lambda@Edge which I can leverage to do some URL rewriting so the site doesn't suffer a bunch of link-rot after the switchover.
- Route53 for DNS. It's where I have my handful of domains registered anyway and allows an equivalent of an apex CNAME so https://paulcourt.co.uk works as well as https://www.paulcourt.co.uk.
- And finally, CertManager for the SSL certs.
I'll cover each one of these in more detail as I go through this write-up.
Yes, this is heavily invested in AWS, but that's where the majority of my experience has been and is currently what I'm using for my current day job - so the more experience I have with the various components, the better. {.small}
Making the dynamic, static
In my short search for static site generators, I dismissed a whole lot that were actually React or Vue.JS frameworks, which is a whole lot of complexity I don't need, the goal wasn't to replace one framework for another. In the end it came down to Jekyll or HUGO as the tool that would turn my posts from markdown into static html.
Jekyll is a ruby gem and has setup instructions and a few warnings about some things maybe not working of you're on a specific version of Ruby. Whereas the HUGO installation instructions were "download the binary and run it from anywhere" - My kind of installation! :-)
![]() {.ml-5 .mr-5 .pl-5 .pr-5}
{.ml-5 .mr-5 .pl-5 .pr-5}
With hugo downloaded and added to my path, getting started was as simple as running...
$ hugo new site blog3
...where "blog3" is the name of the directory to create the new site in. It doesn't need to exist hugo will create it for you, but if it does already exist it must be empty.
I'll be creating a theme shortly, so it seems most of the directory structure that hugo creates can be ignored for now. There is just one thing I discovered during my experiments that is worth getting right from the start - under /archetypes there is a default.md file. This contains the frontmatter tags that will be aded to new content by default.
I added the following block to mine:-
---
title: "{{ replace .Name "-" " " | title }}"
created: {{ .Date }}
publishedOn: {{ .Date }}
lastMod: {{ .Date }}

heroImageUrl: ""
slug: ""

ogImageUrl: ""
ogSummary: ""

tags:
    - tag one
    - tag two

draft: true

summary: ""
---
This covered all the meta-data I have for my current articles.
Then it was a case of running...
$ hugo new post/page1.md
...to create a content page for each of my existing articles.
I only have 16 published articles (and a bunch of scrappy "work-in-progress ones), so I just manually copy and pasted the main article markdown and the meta-data. If I had more content, I could have written a quick script to pull the data from the database and output it in the required format (including the frontmatter tags) - but copy and paste wasn't a problem for me.
Before hugo could generate the static content, I needed to create a theme - which was as simple as running...
$ hugo new theme blog
...and once again hugo sets up a default directory structure for the theme.
The concepts are pretty much the same as other templating engines I had used in the past like twig and freemarker - layouts & partials get 90% of the job done - just with slightly different syntax. So after a bit of googling and experimenting I was able to recreate my existing layout in a few hours.
I'm not going into the full details of hugo themeing here (maybe a topic for a future article). Feel free to explore my theme code on github.
Finally, a quick config change is needed to activate the new theme. By default hugo uses toml syntax, however I'm a bit more familiar with yaml (which hugo also supports), so a quick rename and edit of the main config.yml in the root of the new site as follows...
---
baseURL: "/"
languageCode: "en-gb"
title: "Paul Court's Blog"
theme: "blog"

disableKinds:
    - "RSS"

uglyurls: true

markup:
    goldmark:
        parser:
            attribute:
                block: true
                title: true
    highlight:
        style: github
        noClasses: true
By default, Hugo tries to make "pretty" urls by creating directories named after the markdown file with an index file in the root of that directory. So for most webservers going to /post/markdown-file-name/ would automatically return the contents of the index file.
However, this throws up a problem with storing the content in S3 - Without the .html extension, the correct mime-type is not guessed and the file is transferred as octen-stream which the browser will download instread of displaying.
Setting uglyurls to true means that hugu will generate HTML files with the same name as the markdown file with a .html extension. So my article URLs will be /post/markdown-file-name.html. Which I am perfectly fine with.
There was just one final snag with the article display. As it turns out, the only bit of true dynamic content displayed for each post is that bit on the top of the meta-data block which says:-
This article is: ### days old {.text-center}
Although the other meta-data changes when I edit articles. This was the only bit that needs updating when the article is viewed. However it was a simple fix. I just output a <span> tag with the published date in a standard format as a data attribute...
<span class="value big daysAgo" data-publishedon="{{ .Params.publishedOn | time.Format "2006-01-02T15:04:05Z07:00" }}">0</span>
and update the display on the client-side with a bit of jQuery flavoured JavaScript...
<script>
    $(document).ready(function(){
        $('.daysAgo').each(function (i) {
            let pubDate = new Date($(this).data().publishedon);
            let now = new Date();
            $(this).html(new Intl.NumberFormat().format(Math.round((now - pubDate)/(1000*60*60*24))));
        });
    });
</script>
That's it. One final run of hugo without any arguments and the site is built and ready for the upload. so let's move on with setting up S3.
S3 Storage
I create a normal bucket and DID NOT make any items public like you would if you just wanted to serve files direct from the bucket using AWS urls. Instead, I'll be adding CouldFront into the mix later so I can serve content over https on my own domain name.
All that's left to do for this stage is to upload the files Hugo has generated in the public directory into the S3 bucket. As this is something that will be repeated often (I am planning to write posts more often), I whipped up a quick bash script to run hugo and update the bucket using the AWS cli tools S3 sync command.
#!/bin/bash

# Sets the root to the location of this script.
ROOT_DIR="$( cd "$( dirname "${BASH_SOURCE[0]}" )" && pwd )"

BLOG_ROOT_DIR="$ROOT_DIR/Blog3.0"
BLOG_PUBLIC_DIR="$BLOG_ROOT_DIR/public"
DESTINATION_BUCKET="www.paulcourt.co.uk"
AWS_PROFILE="paul"

if [ -d "${BLOG_PUBLIC_DIR}" ]
then
    rm -rf "${BLOG_PUBLIC_DIR}"
fi

cd "${BLOG_ROOT_DIR}"
hugo

if [ ! -d "${BLOG_PUBLIC_DIR}" ]
then
    echo "No local public dir, aborting."
    exit 1;
fi

aws --profile "${AWS_PROFILE}" s3 sync --delete "${BLOG_PUBLIC_DIR}" "s3://${DESTINATION_BUCKET}"
CloudFront - The final piece of the puzzle
I already had an SSL certificate for my domain names in ACM (Note, certificates must be registered in the US East (N. Virginia) Region), which made things a bit easier and for the most part I followed the AWS guide on using CloudFront to serve HTTPS requests from an S3 bucket, with the following few specific config options:-
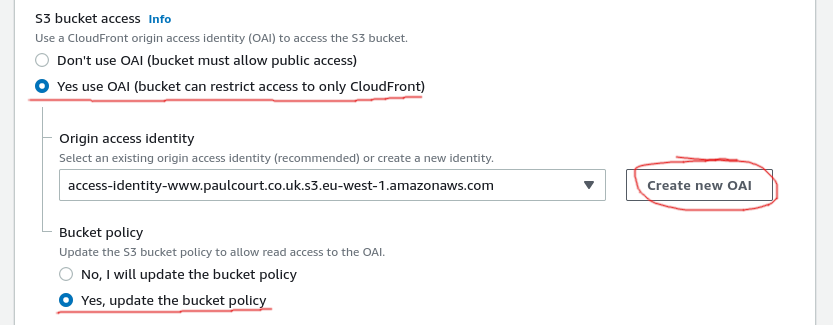
I chose OAI so that I don't need to make the whole bucket public, used the button to create a new OAI and let AWS update the bucket policy to allow CloudFront to access the bucket.
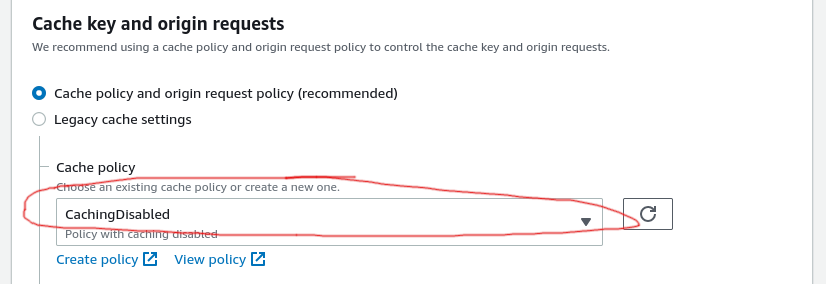
Although it's not the recommended option, I initially disabled caching while I was testing and enabled it later once I had everything setup and working.
The last task to tick off the list was to redirect old article links to new ones on order to keep link-rot to a minimum.
First, a quick nodejs Lambda function. Like the SSL certificates, this must be created in the US East (N. Virginia) Region:-
'use strict';

let redirectList = {
        "/article/installing-starlink" : "/post/installing-starlink.html",
        "/article/javafx-on-raspberry-pi" : "/post/javafx-on-raspberry-pi.html",
        "/article/flxs-public-build" : "/post/javafx-on-raspberry-pi.html",
        "/article/new-blog-engine" : "/post/new-blog-engine.html",
        "/article/pi-server-setup" : "/post/pi-server-setup.html",
        "/article/pi-swap" : "/post/pi-swap.html",
        "/article/logging-metrics" : "/post/logging-metrics.html",
        "/article/front-end-optimisations" : "/post/front-end-optimisations.html",
        "/article/radeon-vii-ubuntu" : "/post/radeon-vii-ubuntu.html",
        "/article/removing-silex" : "/post/removing-silex.html",
        "/article/cross-server-locking-with-mysql-php" : "/post/cross-server-locking-with-mysql-php.html",
        "/article/ditch-the-framework" : "/post/ditch-the-framework.html",
        "/article/life-beyond-php" : "/post/life-beyond-php.html",
        "/article/lets-encrypt-wildcard-route53" : "/post/lets-encrypt-wildcard-route53.html",
        "/article/network-speed-testing" : "/post/network-speed-testing.html",
        "/article/relaunching-soon" : "/post/relaunching-soon.html"
    };

exports.handler = async (event, context, callback) => {

    let request = event.Records[0].cf.request;

    //if URI matches to 'pretty-url' then redirect to a different URI
    if (redirectList[request.uri]) {

        //Generate HTTP redirect response to a different landing page.
        const redirectResponse = {
            status: '301',
            statusDescription: 'Moved Permanently',
            headers: {
                'location': [{
                        key: 'Location',
                        value: redirectList[request.uri],
                    }],
                'cache-control': [{
                        key: 'Cache-Control',
                        value: "max-age=3600"
                    }],
            },
        };
        callback(null, redirectResponse);
    } else {
        // for all other requests proceed to fetch the resources
        callback(null, request);
    }
};
This function checks the requested URL for a match to one of the redirectList keys, and if found returns a 301 response for the new URL. Otherwise it proceeds to handle the request normally.
Finally, this was added to the Origin request association by selecting the type Lambda@Edge and entering the ARN for the function:-

... and that's it. We're done!
Links
- https://docs.aws.amazon.com/AmazonCloudFront/latest/DeveloperGuide/example-function-redirect-url.html
- https://medium.com/@Consegna/use-lambda-edge-to-handle-complex-redirect-rules-with-cloudfront-40e93254d4c1