Installing Starlink
Saturday, 03 April 2021 @ 21:57
Please keep in mind while reading this article that Starlink was in Beta at the time of writing. {.alert .alert-info}
If you're looking for detailed unboxing photos - you've come to the wrong place! I quite possibly had the lid on the box open before the courier was back in his van! What I am going to focus on is the integration with my existing Ubiquity network and some initial speed tests and the first few days of usage.
First, a bit of background on my current situation.
My home is an old farmhouse, standing about 500m in a direct line from the main properties in the village and unfortunately, just about 1km in distance along the route that the BT "phone" cable is laid. Which might not be too bad except that the line isn't even Copper... It's Aluminium (no doubt some cost saving excercise by BT many, many moons ago before even dial-up internet was a thing).
The result, is that when I first moved in I was getting speeds of < 4Mbps download and 1Mbps upload.
Many, many OpenReach engineer visits later, and crossed pairs had been un-crossed, damaged sections of cable had been replaced and I had oped for a second line and a bonded setup at a cost of £400 equipment and £100/mo on service charges for a whopping speed of 35Mbps download and 6-8Mbps upload. Which isn't too shabby, but I work from home full-time (long before COVID-19 was a thing) and there's always been big transfers both up and down as part of my work. So there has always been a desire for something with a little bit more oomf!
So even with the initial "pitch" of:- Better than nothing, 50-150Mbps and probably with periods of downtime, I jumped at the Starlink beta signup as soon as it opened for the UK.
Initial setup using Starlink router
Getting everything setup is really simple. There's a two port power over ethernet (PoE) adaptor which powers both the dish and the router/hub. It's colour coded black and white which makes it really clear which cables go where. If you're thinking about using an existing PoE switch, then double check the power requirements. The Starlink supply is 56 volts (more than the 24 and 48 I have on all my other PoE gear) and the dish requires a fair amount of power.
For an initial test, I put the dish out on the middle of the lawn with plenty of clear sky and ran the cable through the window to the router. Then joined the WiFi from my phone to complete the setup with the Starlink app. the first few initial speed tests came in between 30 and 80 mbps. I then hooked the "AUX" port upto my laptop and saw an instant increase to 120-140 mbps.
Connecting to my home network
With the initial verification that I didn't have any duff hardware and everything was functioning as expected, it was time to move on to hooking it into my existing network.
This is a 100 year old farmhouse, and like every other "consumer" hub that has come before it, the Starlink router/hub didn't fair any better with almost total loss of WiFi signal as soon as you move into the next room (The walls are very thick and are all solid brick). Which is why I have invested in a bunch of Ubiquity products with a base station installed in almost every room.
From the support FAQ's on the app and the Starlink website, SpaceX are taking the very understandable stance of "you can try your own hardware, but this would be a completely unsupported option". Unfortunately, there is also a lack of ANY technical information that you might need to use your own equipment.
My initial expectation was that like many xDSL or cable modems, there would be some kind of PPPoE configuration required. However, as it turns out the dish handles everything on that side and all I had to do was plug it into the WAN connection on my UDM Pro and configure it for DHCP and I was up and running.
Speed tests / general usage
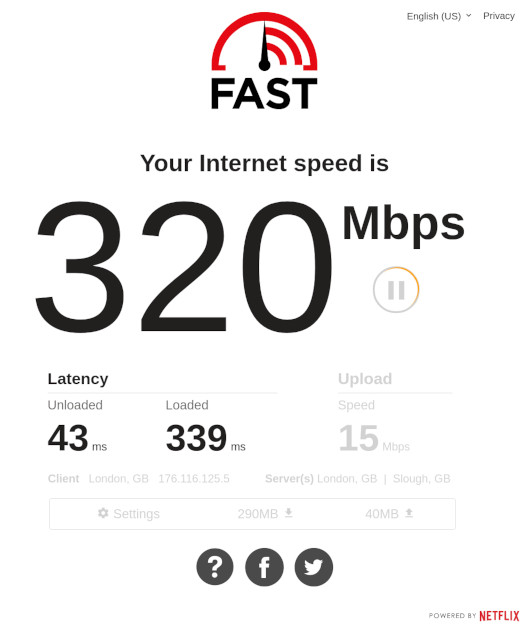
When running relitvely short speed tests like fast.com or speedtest.net the speed varies quite considerably. I've had test results well over 300Mbps as well as results well below 50Mbps.
When calculating the speed over a longer time (like downloading an ISO) the average speed is very consistent, though. Several downloads of the latest Ubuntu ISO (2.8GB) were taking between 1m 45s and 2m 10s consistently. This works out as average speeds for the downloads between 175-220Mbps.
Originally, I wanted to make some assessments on the stability of the connection as a whole - how many times did I get completely disconnected, etc. Unfortunately, my Ubiquity Dream Machine Pro decided to choose these last few weeks to start miss-behaving. With a memory leak in one of the components eventually causing the whole system to lock-up. So it's impossible for me to say for certain if any issues were a result of the Starlink connection or the UDM Pro.
With that being said, I have had daily standups using Google Meet and a few longer calls using Zoom which have all been completed without any issues.
On two occasions the software in the "dish" has locked up and it has required a hard power cycle to get things working again. But I have just noticed a bump in firmware since the last time that happened - so fingers crossed.
Pole installation
With the initial tests being successful, it was time to get on with a permanent installation before someone ran over the dish with a lawnmower!
I had a bit of chromed brass pipe offcut from a bathroom sink or bath waste pipe which was a perfect fit to go over the end of the Starlink dish pole. So with a little bit of drilling and filing I made an adaptor which lets the dish "click" on and off using the same spring loaded clips that attach it to the tripod base that it came with.
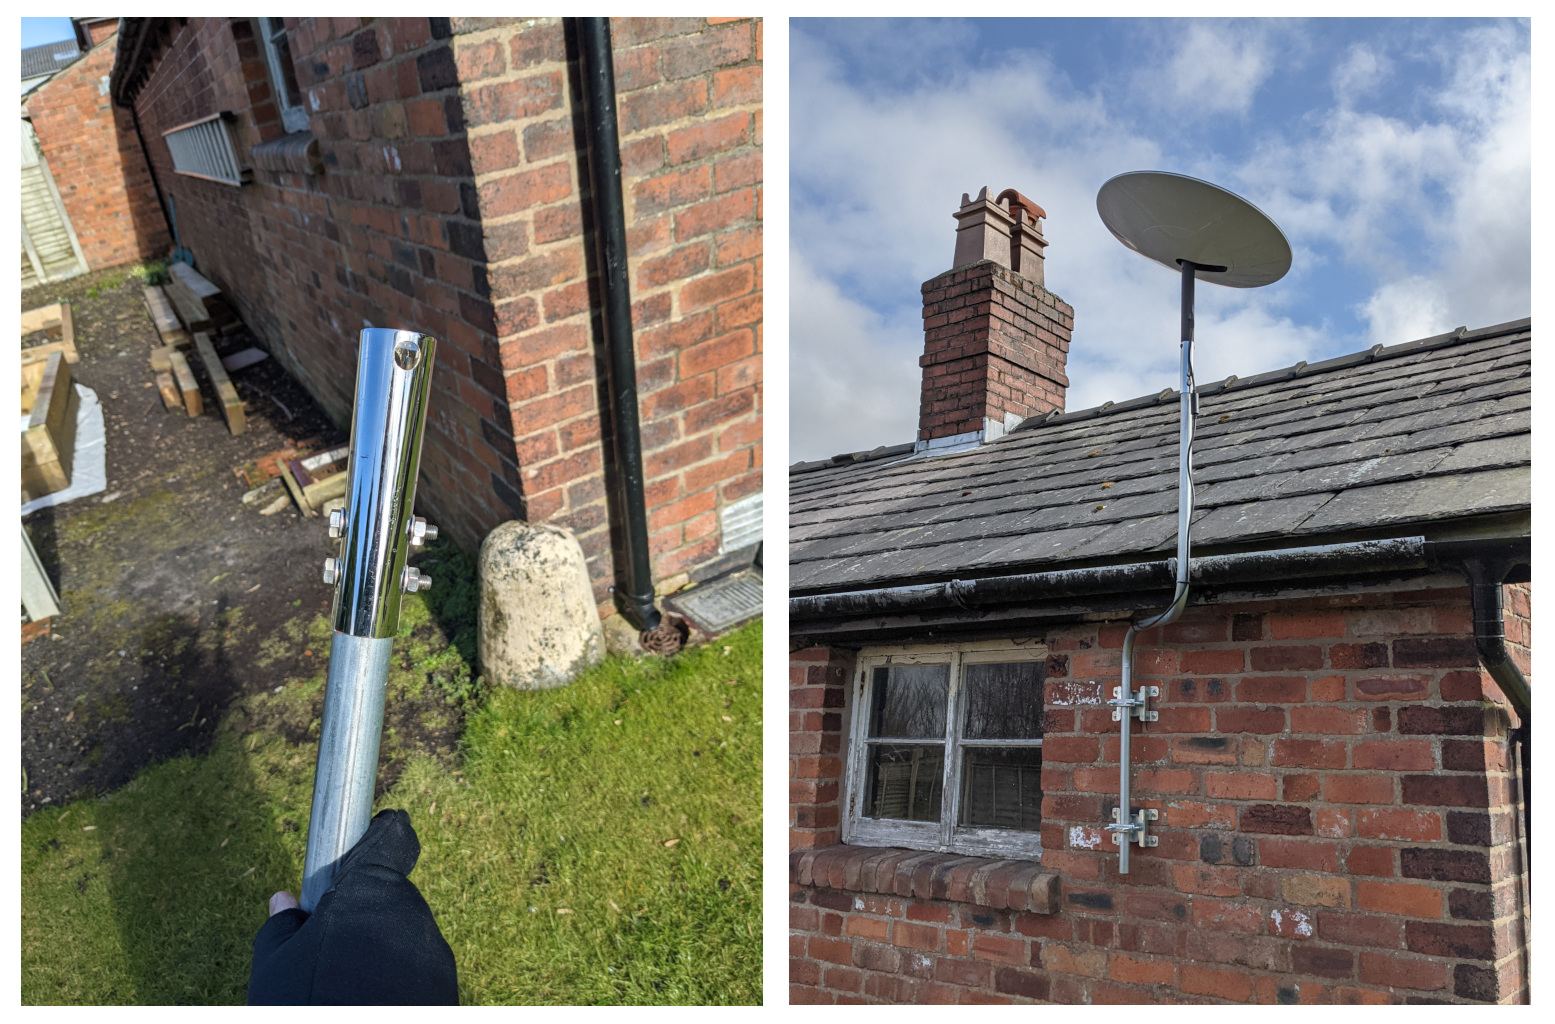
The pole is a "heavy duty" aerial/satellite one from Toolstation. Pretty much all of the standard ones I had found were rated upto 5KG and the dish weighs just a little bit more than that. Plus, we are in an exposed area and get some strong winds, so I felt it was best to go with the heavy duty pole.
The cable from the dish is fixed to the dish and has a moulded plug on the other end. It's also considerably thicker than any other ethernet cable I have come across - probably due to the 56v PoE and high current that the dish can pull. Not only does the ethernet plug have to fit through the wall, but also a ferrite bead around the end of the cable. So routing it through walls was a potential issue.
Fortunately the out-building I had chosen to mount the dish onto had an old blocked up air duct I could clear out, pass the cable though and reseal with some expanding foam (I'll eventually get round to skimming over with some mortar too). I hope with the final product, SpaceX provide non moulded cable and/or provide some easier options for installation. There's a big difference between drilling an 8mm hole in a wall and a 25mm one!
getting the app to work
Finally, ater coming across an article on Reddit, I was able to get the Starlink app working (90% of it anyway) even without using the Starlink router.
The app tries to connect to the router via a non-configurable IP address of 192.168.1.1 and to the dish directly via 192.168.100.1.
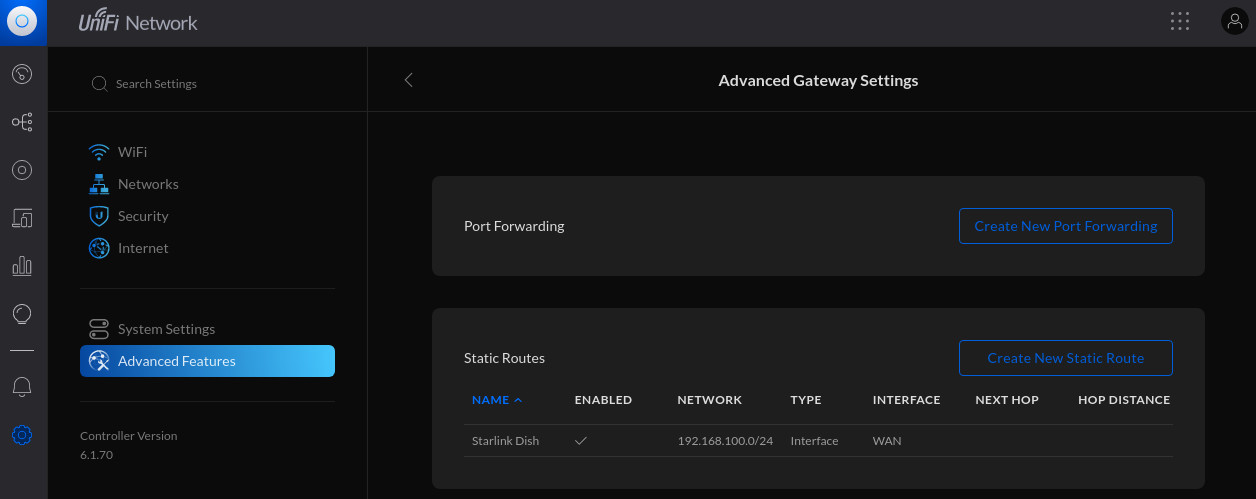
There's not a lot I was willing to do with the router at the moment because that's the same IP address that my UDM Pro is using and I did want to reconfigure that again at this moment (I've been having enough issues with it currently). Accessing the dish was easy though. It just required adding a static route to the UDM Pro via Settings -> Advanced Features -> Advanced Gateway Settings and adding a static route to send traffic for 192.168.100.0/24 to the WAN interface.
Now I could launch the app on my phone and almost everything works. This is good for keeping an eye on the signal to noise ratio and the obstruction information - we've got some big trees here and it'll be good to know if I need to get the chainsaw out once they have all filled out with leaves in the summer! :-)
If the Starlink router is to provide any required information for the app, it would be a big bonus if it's IP address was configurable, both in the router itself and in the mobile app.

Summary
All-in-all, I am VERY impressed with Starlink so far. For something that is being billed as "better than nothing" and with estimated speeds of between "50 to 100 Mbps".
Not only is it smashing it's own expectations, it's left just about every other internet option available to me standing in terms of speed for the same price point. Clocking in at between 5x and 10x the speed of my dual VSDL lines.
With the exception of just one or two blips, it has been a perfectly usable service. So much so, that I'll be cancelling one of my VDSL lines next week and just retaining one on a minimum package as a backup for another few months. If things continue as they are, I will most likely cancel that too, eventually.